 If you are thinking about getting chickens or have chickens already you know (or will know) that buying a chicken coop is a large investment. In this article I will explain how to build a super simple chicken coop, but depending on your needs this might or might not be the best option for you.
When we decided to start raising chickens about 3 years ago we went the quick and easy route and decided to buy a premade chicken coop, and after I saw the prices of some of these chicken coops I basically purchased the cheapest chicken coop I could find.
The chicken coop I purchased was about $350 from our local feed store and initially looked and worked great. The problem was that over time the chicken coop began to fall apart because it was it was exposed to the elements and made from cheap materials.
My initial investment of $350 for the cheap chicken coop plus the $275 cost of building a chicken coop to replace the original just under 3 years later is a total of $625 that I could have spent on the original coop, and it would have lasted much longer. Or I could have just bit the bullet and built the chicken coop myself to start with.
If you are looking into getting your first chicken coop think about the following…
- Do I have the time to build a chicken coop?
- How long will the premade chicken coop last?
- How much am I willing to spend?
- How many chickens do I want? And will I want more?
DIY Chicken Coop Design
If you decide you want to try your hand at building your own, this article will show you how to build your own chicken coop. I have had very little experience with construction so I can say that this is a fairly easy project and takes about 30 hours to complete.
I can’t add all the pictures I took to this article so I made a PDF that might give you a litle more detail about this chicken coop that you can download at the end of this article.
Lets start with the tools and supplies you will need…
Tools:
- Miter Saw or Circular Saw: A miter saw will help get perfect angles but is not absolutely necessary. [Here on eBay]
- Nail Gun: This is not absolutely necessary either but will make life much easier on you. I purchased the $70 pneumatic brad nailer
and small air compressor.
- Level & Square: You want to make sure everything is square or your chicken coop will look like something out of a Dr. Seuss book.
- Miscellaneous tools: Tape measure, Hammer, pencil, safety glasses etc.[Here on eBay]
Supplies:
This chicken coop is 6 foot wide X 4 foot long, and 4 foot tall in front, sloped to 3 foot tall in the back. I chose these measurements to minimize waste of materials, hence the “super simple” part. Here are the materials I bought for this chicken coop, If you have some of these building materials already you can reduce the cost quite a bit.
- 8 Ft 2 x 4’s: 21 X $2.74 = $57.54
- 4 Ft X 8 Ft OSB (Like Plywood) Board: 4 X $8.65 = $34.60
- 6 Inch Wide Fence Pickets: 46 X $1.88 = $86.48
- 8 Ft 1 X 2’s for Trim: 15 x $1.23 = $18.45
- 8 Ft 1 X 4’s: 3 X $1.38 = $4.14
- Nails & Hardware Estimate: $20
- 12 Ft X 2 Ft Plastic Roof Panels: 2 X $25.94 = $51.88
Total Cost of Supplies: $273.09
Starting Chicken Coop Construction
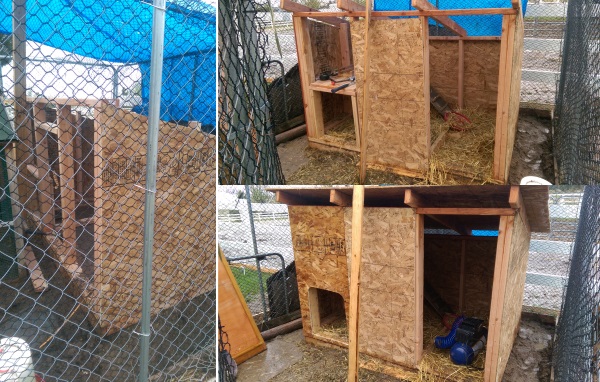
This chicken coop design is basically a dwarf sized storage shed, it is built with 2 x 4’s and OSB board which is like plywood only cheaper and better quality. I plan on this coop lasting for many years to come.
Just like anything else it all starts with the foundation, I used a piece of 4 x 6 OSB board framed with 2 x 4’s around the bottom along with 2 x 4’s across the middle for support. We have our chickens fenced in so this just sits on the ground, but you can also add a fenced in area underneath if you need to. [Example Picture]

The next step is building the wall frame, this is much easier to do if you assemble the walls before you nail it to the foundation. Put a stud (2×4) every 2 feet for support and 2 2×4’s together at the corners. I also added a 2×4 in the top center to be used for a vent area.
The front wall is 4 feet high (from the foundation) and the back wall is 3 feet high. To keep these upright you will need to fasten a temporary piece of wood angling from the wall to the foundation.
The walls are made from the OSB board, but only attach the side walls at this point because you are going to want room to finish the inside before you close the chicken coop up.
The side walls are 4 feet tall at the front, and 3 feet tall at the back, the back wall is 3 feet tall x 6 feet long. Don’t worry about the front wall or yet because it will be 3 different 2 foot wide sections.
The way I did the roof gables was basically eyeballing it. I took a 2×4 and traced where the notch should be to fasten it to the front and back wall, then copied that pattern to the other 2×4’s…not very scientific, but it worked.

The roof gables also extend 6 inches past the front and back of the chicken coop to keep water out when the roof is added.
I was reminded by my wife that this was just a chicken coop, so I decided to keep the inside simple, the right half was where their eggs, and the left half was where I put their loft and door.

I framed around each corner with 24 inch tall 2×4’s and used 1×4’s across the middle to support the platform. The platform is made from 1×4 strips with about a quarter inch gap between them. Later on I took the ramp from the old chicken house and added it to this one (not pictured here).

Instead of trying to measure all the openings on the front I just tacked the first 2 foot x 4 foot OSB board up, traced the chicken entry outline with a sharpie and cut that pieces out with a jig saw. Then I did the same for the vent hole and the full sized door panels.
I used the piece of OSB that was cut out for the door to make the door itself. I made another frame for the door out of 1×4’s to make sure it was square and fit with the hinges.
I also framed the OSB board with some 2×2’s I had in the garage to give it a little extra strength. When you nail the door frame to the chicken house make sure it stays level and square, it will save you headaches when you put the door and hinges in.
Finally I added some steel netting from the old chicken house over the vent and sealed the edges around the roof with 1×4’s and extra OSB underneath the overhang and put on the roof which measures 7 feet long by 5 feet wide.
Finishing the Chicken Coop
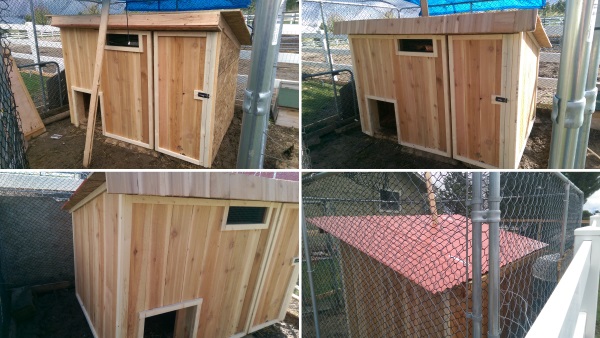
Finishing the chicken coop is not absolutely necessary, after all it’s just a chicken coop. You could just paint and waterproof the OSB and call it a day but if you want it to last more than a few years you will want to put some siding over the OSB and 2×4’s.
After a lot of research I found that 6 inch fence pickets and 1×2’s was the best option at the lowest price. It was fairly easy to trim the chicken house out, it was just a little tedious because every piece needs to be measured individually.
And for the roof I decided to buy 2 pieces of 12 foot by 2 foot corrugated plastic roofing which I cut in half and fastened to the roof with some roofing screws I had left over from DIY Greenhouse Design
The one thing I have left to do is decide whether I want to stain it or paint the chicken house…I’ll let Lisa decide, and maybe she will do it! 🙂
Extra Pictures PDF
[button_3 text=”download-now.png” align=”center” href=”http://traffic.libsyn.com/survivalistprepper/DIY_Chicken_Coop_Design.pdf” new_window=”Y”/]
Give it a Shot…
I know these aren’t the most detailed instructions, but if you decide to give it a try and have any questions leave a comment below or send me an email, I will answer you to the best of my ability.
Like I said, I am not construction worker and I learned how to build this chicken coop as I went and it has exceeded my expectations.
Dale
4 replies to "How to Build a Super Simple Chicken Coop"
I like the style of this chicken coop. To think that you are not a construction worker. You did a great one!
I love it going to build ours today. I am so excited!
Could you please tell me how many chickens you can house in here? Thank you
Hi Mandy, I recently added 2ft to it and we have 10 chickens