 Because we live in Colorado we have a shorter growing season that some of the southern states. Because of this I decided to see how I could extend the growing season a little by building a diy greenhouse. I have no construction experience, but I do love a challenge, so I decided to go for it. My thinking behind building a greenhouse was not only to extend the growing season, but also learn about building a structure that might be necessary in the future.
(There is also a video at the end of the post that goes into more detail.)
This is by no means the log cabin I plan on building in the next couple of years, but it gave me some practice and it allows me to “test” some things out here at home before I put the time in at our property.
Now I’ll be honest, Lisa has been the one doing all of the gardening for years, but I figured I might have no choice in the future so I might as well get my hands dirty (pun intended) while I can.
Growing my own food, and knowing where the food came from is one of my top priority’s. Eating healthy now is just as important to me as not having to eat out of a can in the future.
Greenhouse Supplies
The supplies you need will be different for everyone so this list might not be exactly what you need, this is just what I used.
8 – 10 ft 2 x 4’s I think I might have even bought a couple extra.
14 – 10 ft 2 x 6’s For the foundation of the greenhouse and the raised garden beds.
10 – 1 x 2’s – To seal the film on the greenhouse.
5 – 8 ft 1 x 4’s For the window and door frames.
3 – 8 ft 2 x 2’s for the door.
4 – 6 ft Landscaping timbers. I used these because I already had them, 4 x 4’s would probably work better.
A lot of 3″ screws – Nails would have been cheaper and in the future a cordless drill might not be an option, but I wanted the added strength.
6 mil Greenhouse film – I needed about 50 feet of greenhouse film and it cost me about $100, but don’t be cheap, you want it to last.
Double sided foam tape – I used about 100 feet of double sided tape to seal the greenhouse film.
6 greenhouse roofing panels – These were $30 each but I bit the bullet because of their strength.
10 ft roof gable – This roof gable might have been unnecessary but I chose to get it anyway.
Along with the above I purchased a few hinges and metal plates (to reinforce the joints) that are optional and really depend on how your design and skill is.
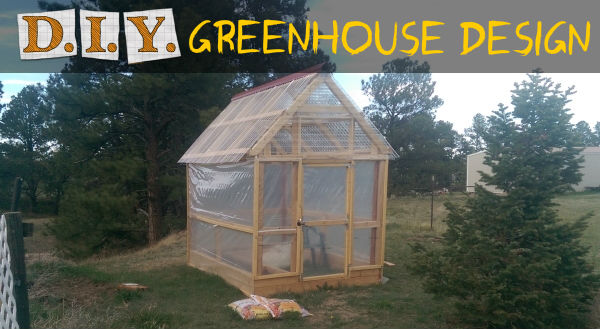
The foundation

I was lucky and found a level spot to put the greenhouse so there was no digging or leveling. Try to find the flattest spot you can to minimize the work. I also dug 2 foot holes for each of the corners.
I also made the greenhouse 10 feet long so I didn’t have to cut the 2 x 6’s. I did have to cut the front and back though. Then I took 2 x 4’s and attached them 3 feet up and at the top of the landscaping timbers and attached 2 x 6’s half way down the sides up to the 3 foot high 2 x 4.
I did not attach anything to the front because that is where the door will go. I also cut the tops of the landscaping timbers off level with the 2 x 4’s to make sure the roof was level.
Roof frame template

This was a little tricky but a lot easier than trying to measure each truss. It also made everything uniform. I used 2 pallets and made the center point of the roof where the 2 pallets met in the middle.
Measure the width of the greenhouse and divide that in half to get the distance from center on each side. I got this idea from this article here, it might help a little bit. I made 4 of these, but that depends on your design.
Attaching the greenhouse roof

This part will take two people, once you get the greenhouse gables attached to the frame and a center piece running along the top, it should be fairly stable. You will see in the picture below that I put 1 x 6’s running lengthwise for added support.
I attached the roof to the frame with metal tie plates and nails. Something like these, I also used these for the door.
Greenhouse door and window

After I got the roof and the frame done I started working on the door. I built the greenhouse frame first and then added support around it. Once I got the door frame in I made the actual door from 2 x 2’s you will see in a later picture.
The raised garden beds

Once I had the frame and the greenhouse roof were done I moved on to the raised garden beds. I used 2 levels of 2 x 6’s fastened together with another piece of 2 x 6. The outside 2 foot landscaping timbers were an idea, but are no longer there so disregard those.
I only lined 2 sides with raised beds because I plan on installing an aquaponics system in the near future…stay tuned.
Putting the cover on

I attached the 6 mil film around the outside 3 sides (not the front) using the double sided tape (above) to keep it separated from the frame, and also to add strength to the seal. I then added 1 x 2’s along the outside edges (below) to “pin” the film in for lack of a better term.
Then the fun part, cutting and putting up the roof panels. This is something that 2 people should do, but I decided to do this myself. At the very least you should have someone hold the ladder. I fastened the roof panels with drywall screws and rubber washers. You will be able to find these with the roof panels.
I did the front and back face with the leftover pieces of greenhouse roofing. I am not sure when I am going to get to the front window, so I left it sealed for now.

With the door I just used 2 x 2’s measured to fit within the frame with a piece across the center. I also used the tie plates on the corners.
For the handle I used a regular gate lock, but remember! Once the greenhouse is complete you will need to get out when the door closes. Here is how I solved that problem…

I literally went through all the junk in my garage and “MacGyvered” a door latch. I used some paracord, some hinges and a metal loop I found. I drilled a hole through the 1 x 4 (angled down slightly) and fastened the paracord to the gate latch. Now when I pull the paracord the latch lifts up and I don’t have to wait for Lisa to come to my rescue.
Like I said earlier I had no plans when I built this diy greenhouse other than what I had swimming in my head. I looked around the internet, used pinterest, YouTube and whatever else I could find and found something that worked for me.
The best part about building this greenhouse was learning how to do it, and the satisfaction that I actually did it. Now I just need to start planting and see what I can grow…that’s a later post.
The video below goes into more detail than I can put here, but if you still have any questions leave a comment below and I will answer to the best of my ability.

Thanks,
Discover more from Survivalist Prepper
Subscribe to get the latest posts sent to your email.
7 replies to "DIY Greenhouse Design"
Wow Dale! Impressive. You make it look very easy.
Thanks Julie, It was definitely not easy, but it was fun. Now we’ll see if I can grow anything in there lol
Nice!
What was the total cost of your project? This looks like something my hubs is wanting to do. This may be his inspiration!! Thanks!!
The total cost was about $500 but it could be less depending on what supplies you have around the house. The half of the cost was the covering, I expected about half of that so it took me a little longer than I expected. It was a fun project just to see if I could do it…now part 2, I need to grow something 🙂
Thanks Amanda!
Dale
Hey brother
I too am I sunny CO and have built several green houses and i managed to get tomatoes to produce well in to November and my herd garden it on its second year (all same plants) and wintered great this last season and you know as I do how cold it got. Ventelation is key! A green house can kill all your plants within two days if not careful control of ventilation (just need a simple but consistent air flow). The build looks great man the podcast rocks
Thanks Kyle! As of right now ventilation is not an issue because I haven’t sealed everything. But when I do I plan on putting windows in the front and back….we’ll see 🙂