 As a prepper I am always looking for more ways to maximize the space I have for storage. That’s why I decided to make a under the bed storage slider. While one of these isn’t “absolutely” necessary because you can put anything under the bed with a kick of the foot, it does make things much more convenient.
The reason I decided to make this slider for under the bed is because putting things under the bed is easy…getting them out can be a chore. You need to grab a flashlight, kneel over and search around until you find what you are looking for.
While there are other options like storage totes and wire baskets, I wanted to maximize the storage space under my bed. As preppers we have so much stuff that we are always looking for different ways to store and organize.
Even if you don’t decide to store canned food, bottled water or anything else preparedness related, it’s still a great “out of sight, out of mind” storage solution. I’m sure Lisa’s side will be at least half filled with shoes and photo albums.
Watch the Step By Step Video at The End of This Article

Storage Slider Instructions
This under the bed storage slider is a great weekend project, and well worth the time it takes to build. The quality of materials you use is completely up to you. I chose to go on the cheaper end because this is something that will go under the bed, and no one will ever see it.
Skill Level: Easy to Intermediate
Completion Time: 5 hours (Not Including Wait Time for Paint)
Cost: $70 ( Depending On the Materials You Use)
Supplies Needed
- 2 Plywood (8’ X 4’)
- 6 8’ Trim Pieces (¾ X 1”)
- 10 Furniture Sliders (Plastic for Carpet, Padded for Wood Floors)
- Finishing Nails (I Used a Nail Gun With Brad Nails)
- 1 1/4” Panel Screws (24)
- 2 Drawer Handles (I Chose Not to Use These)
- Liquid Nails (Or Alternative)
- DryDex Spackling (If You’re Cheap Like Me)
- 2 Qt of Paint (Optional)
Tools Needed
- Circular Saw
- Drill and Bit (1/16”)
- Hammer (Or Nail Gun)
- 2 Clamps (For Straight Edge)
- 6’ long straight edge (I Used a Piece of Old Trim)
Cutting the Plywood to Size
I started off by measuring the available space under my bed. In my case it was 5 1/2′ X 6′. I then divided the width by 2 because I wanted 1 slider for each side of the bed. His and hers sliders I guess you could say. So in my case I needed 2 pieces that were 3′ X 5 1/2′.
When cutting the plywood to size with a circular saw you need to take a couple things into account. The first is that in order to get a straight cut, you will need some sort of straight edge. I used a prefabricated piece of old trim that was over 5 1/2′ long. The second is that you need to take into account the width of the base plate when measuring.

Cut both pieces of the plywood to the correct length and width you measured earlier. Remember, this is half the width of your mattress. In most rooms you won’t have room to pull out the entire slider from one side. Having 2 pieces also makes it convenient because you have a “his and her’s” like I mentioned earlier.
NOTE: With a smaller twin bed you could probably get away with 1 piece.
Adding the Trim
 Once you have the plywood cut to the correct length and width, you will need to cut the trim pieces to fit. After that you need to nail them in place. I used a nail gun in the video because it is much easier, but you can use a hammer and finishing nails.
After that I turned it over and added some panel screws for more durability and support. Without the screws you could easily pull the trim off as you are sliding it in and out. To prevent splitting make sure and drill 1/16th” holes to remove excess wood. It’s up to you how many screws you add. I used 5 on each long side, and 3 on the shorter sides, and you probably shouldn’t go any less than that.
Sanding and Finishing
 Once you have the trim on nice and sturdy you can begin sanding and painting. If you go the low cost route like I did, you might want to take some spackling and fill in any cracks and knots. After that you can add whatever paint you like. I used Kilz Primer for the first coat, and then white interior semigloss for the second coat.

Note: Instead of painting the slider you could use stain, although that would require higher quality wood and no spackling. You will be able to see any blemishes and imperfections through the stain…that’s why I chose to slap some paint on them.
Making it a “Slider”
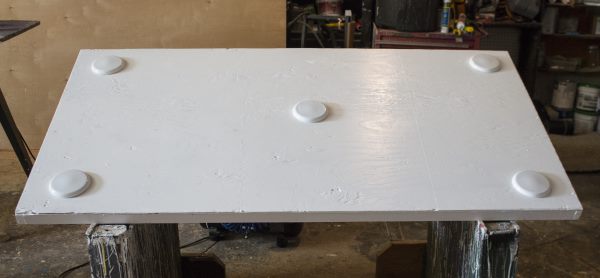 So after you have everything sanded and painted you need to actually make it a slider. You could use casters (small wheels) but I chose to use furniture sliders. The reason I chose sliders is because I didn’t want to lose any height or storage space.
I used a liberal amount of liquid nails (maybe too much) to attach these because I didn’t want to drill holes in the wood. You could probably use super glue or wood glue, but my thinking was liquid nails would be stronger…we’ll see in a few months.
NOTE: The plastic sliders shown in the picture are for carpeted floors. If you have wood floors make sure and get the padded sliders.
If you have any questions, leave a comment below. Also, if you try this out make sure and tell me how it went?
![]()